Part 21 – Some Skin on my Nose

Welcome back to another build diary, thank you for your patience as we move into the final stages of this build.


This is your final chance to be heard in your opinion of which aircraft we should decorate this model as.  Last time we had a significant response extending our list from four potentials to nineteen.  Next time we’ll present everyone with our shortlist and ask you all to choose between them.  We would prefer if all of the suggestions had photographs of the aircraft, especially any nose art that we could use to guide us in our decorating.  The full list of potential aircraft is below:

  • An aircraft from 582 Squadron (Pathfinders) suggested by a member of Pathfinder Lodge 7255,
  • L7537 of 44 (Rhodesia) Squadron letters KM-L which was shot down on a mission to Dusseldorf in August 1942,
  • LL777 of 61 Squadron QR-S with its nose art of a hand holding a pair of playing cards,
  • LM360 of 61 Squadron QR-O the aircraft which Bill Reid won his Victoria Cross,
  • W4133 of 9 Squadron WS-Z “Zola” which we have good images for in the IBCC Digital Archive,
  • ? 61 Squadron QR-X,
  • JA914 57 Squadron DX-O lost over Berlin 3/4 September 1943,
  • LM621 100 Squadron HW-C lost on ops to Veirzon Rail Yards 1 July 1943,
  • ED497 ? Lost on Ops to Cologne,
  • LL687 408 Squadron HW-C “Berlin Special” suggestion provided with photograph,
  • 50 Squadron VN-B “Baker” flown in by Sir Michael Beetham and Reg Payne,
  • W4157 ? WS-V “Barbara Mary” Lost 17/18 January 1943 provided with photograph,
  • KB791 428 Squadron RCAF NA-A flown on by the proponent’s Grandfather,
  • ? 649 Squadron OJ-A “Heavenly Hilda”
  • ? 50 Squadron VN-N “Nan” an aircraft flown by James Flowers,
  • ? 619 Squadron PB-X Shot down over Heilbron 4 December 1944,
  • ME812 166 and 153 Squadrons AS-F/P4-F “Fair Fighter’s Revenge” flew 100+ operations including Ops Manna and Exodus,
  • JB405 12 Squadron “Hellzapoppin” Flown in by D Hayhurst, for whom we have a collection in the IBCC Digital Archive
  • “S-Sugar” the default which comes with the model.

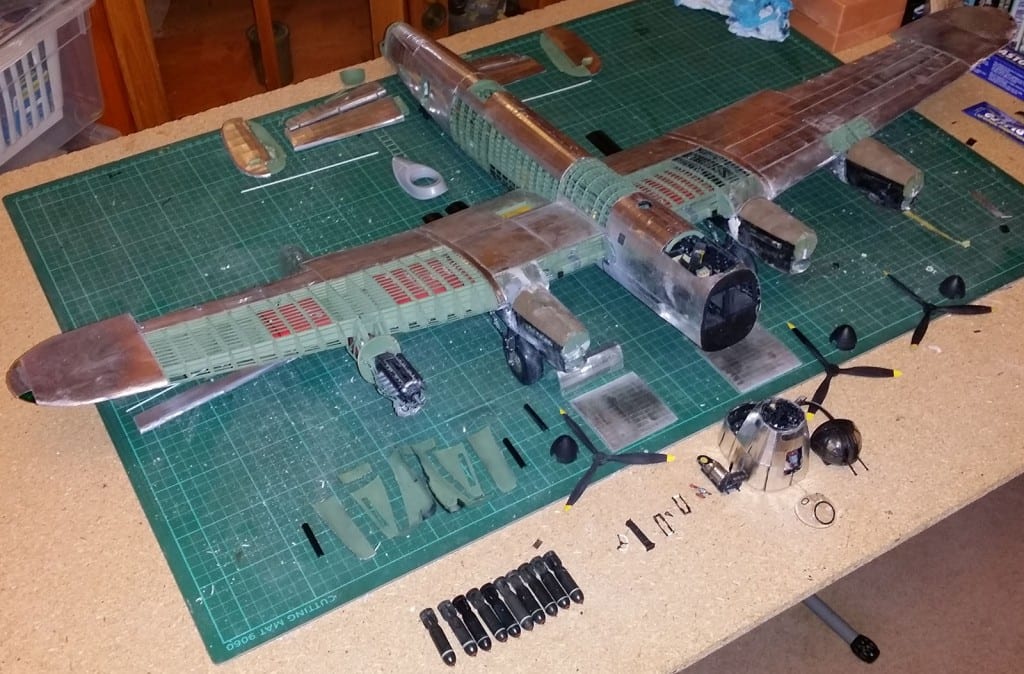
Moving on to the build diary, last time we attached the wings, and covered much of the fuselage in skin.

Pic 20-33

This time we started with these parts.

Pic 21-01

Plus all of the pieces we cut a few weeks ago for the bomb-aimer’s position.

First, we assembled the smaller pieces together to create some of the bomb-aimer’s control panels, hinges for the rudders, and the bomb-sight.

Pic 21-02

These were then set aside to be primed and painted.

Next, we masked up the nose turret canopy for painting, this took a lot of masking tape, a sharp knife and quite a bit of patience.  You can see it here next to some of the other components for the turret itself.

Pic 21-03

Having set aside those pieces for painting as well we moved on to marking up the pieces for rivet marking.  Here you can see all of the pieces of skin to cover the bomb-aimer’s position (18 separate pieces!) with the nose section.

Pic 21-04

And here are all of the pieces prepared for rivet marking, including the three panels which are designed to be detachable.

Pic 21-05

These than all had rivet markings applied, these are the last sections which need treating in this manner.

Pic 21-10

We then attached the hinges to the rudders.  You may notice that one of the hinges is missing.  One of the “T” plates was missing when we opened the bag, the other half of the hinge was applied in the correct place on the main model.

Pic 21-11

Before we finally moved on to painting everything.

Pic 21-12

The nose turret and bomb-aimer’s blister went together pretty quickly after that, as did the installation of the newly finished control panels and the bomb-sight.

Pic 21-13

Here’s a slightly closer view of the nose turret fully completed.

Pic 21-14

The Bomb-sight and control panels, and the cupola.

Pic 21-16

Pic 21-15

And the bomb aimer’s bench.

Pic 21-17

Before we moved on to attaching all of the fuselage panels.

Pic 21-18

And here is a view back through the bomb-aimer’s position from where the cockpit will be.

Pic 21-23

Finally, the blister’s support ring was added along with the two “A-frames” which go inside the blister.

Pic 21-25

Next, the skin and rudders where attached to the vertical stabilisers.  Then these parts were set aside to be painted with the rest of the aircraft.

Pic 21-24

Whilst all of this was going on I had passed the task of getting the engine, undercarriage bay and nacelle cowlings to actually fit together to a modeller with far more experience than I.

After a few attempts he determined that the sections of the under carriage cowlings that were meant to follow the engine bulkhead would never be able to maintain the proper shape, so he removed them and replaced them with a strip of scrap metal from the process of cutting fuselage panels.

Pic 21-06

Before using filler to close gaps around the edges.

Pic 21-07 Pic 21-08 Pic 21-09

He later removed much of the filler, but has not yet reached as far as the dorsal side of the model.

That brings us to the end of this build diary.

Pic 21-26

Pic 21-27

Pic 21-28

Next time we will be building the two bomb-bay doors (with their 72 skin panels), finishing the fuselage and building the other two turrets.

Part 20 – So much to do, so little time

Sorry to all again for missing last week’s planned update, unfortunately as we approach the end of the build process the complexity of the work is increasing.  As such, for the last three Build Diaries (covering issues 117-120, 121-124 and 125) we will only produce them when they are actually ready.


We are still open to suggestions for aircraft to build the model as, the ones which have been suggested thus far are as follows:

An aircraft from 582 Squadron (Pathfinders) suggested by a member of Pathfinder Lodge 7255,

L7537 of 44 (Rhodesia) Squadron letters KM-L which was shot down on a mission to Dusseldorf in August 1942,

LL777 of 61 Squadron QR-S with its nose art of a hand holding a pair of playing cards,

S for Sugar (the default which comes with the kit).


Any others would be gratefully appreciated, especially if there is a photograph or art showing any nose art.


That said, I can now finally show you our work for the last fortnight.

Last time the main focus of attention was the cutting out of the various fuselage panels and the assembly of the model minus the bomb-aimer’s position and the wings.

Pic 19-42

This time we’ll be working on attaching the wings, adding in some of the bomb-aimer’s equipment, and covering most of the fuselage with metal skin.

The parts for this diary were as shown here.

Pic 20-01

With the skin sheets (all marked up for adding rivet marks) shown here.

Pic 20-02

And with the proper rivet marks and curvature (achieved by bending the sheets around a knife handle and checking frequently against the curvature of the frame).

Pic 20-03

After marking out the rivet lines the next step was to build one of the control panels from the bomb-aimer’s position, and the escape hatch for the same.

First was removing the parts from their frets.

Pic 20-04

And then gluing the parts into their final format.

Pic 20-05

Before adding the small metal detailing parts, also shown here is the guard rail which had its middle rail attached at this stage.

Pic 20-06

Then the two metal skin pieces for the escape hatch were attached to the frame and filed into shape.

Pic 20-07

All of these parts were then set aside to be painted.

Before moving on to that task, six small detail parts (part of the aileron attachments) were laid out (three are shown here).

Pic 20-08

And holes were drilled into the upper skin of the two wings to hold them before they were glued in.

Pic 20-09

This photograph shows the plastic mouldings which will cover the engines and undercarriage bays following preparation for painting.

Pic 20-10

These were also set aside to be painted.

As shown in these photographs.

Pic 20-14

Pic 20-15

Pic 20-16

Pic 20-11

The set of pieces in the second photograph were then taken to form the joint in the two wings.

Pic 20-12

Before the two wings were attached to the fuselage for the first time.

Pic 20-13

Unfortunately, as discussed in last week’s interlude, things didn’t go according to plan and the work had to be redone.

Pic 20-17

Pic 20-18

The joint was then strengthened with stringers crossing from one frame to another.  Then a strip of metal skin was placed over the joint.

Next, the radiators were added to the engines and the loose wires attached to them.

Pic 20-19

With the painting done, attention could turn back to finishing off the bomb-aimer’s control panel and the camera.

Pic 20-20

Before installing two metal panels into the interior of the bomb-aimer’s position.

Pic 20-21

And then adding the control panel, camera and safety rail.

Pic 20-22

Pic 20-23

Pic 20-24

This section was then set aside until the next Build Diary.

The last task for this build diary was to take the skin sections prepared a fortnight ago, and add them to the frame.

Pic 20-25

Pic 20-26

Pic 20-27

Including adding both skin and navigation lights to the two wing-tips.

Pic 20-28

Pic 20-29

And the horizontal stabilisers.

Pic 20-30

Bringing us to the end of this build diary.

Pic 20-31

Pic 20-32

Pic 20-33


Interlude

Dear all, I’m afraid that I wasn’t able to finish the work I promised for this week due to complications arising from a flawed wing installation.


In the mean time I would like to repeat our request for any suggestions for either the display of the model, or any suggestions as to which aircraft we should finish the model as.  So far we’ve have five possibilities, and are looking for more.


The options we currently are exploring are:

An aircraft from 582 Squadron (Pathfinders) suggested by a member of Pathfinder Lodge 7255,

L7537 of 44 (Rhodesia) Squadron letters KM-L which was shot down on a mission to Dusseldorf in August 1942,

LL777 of 61 Squadron QR-S with its nose art of a hand holding a pair of playing cards,

S for Sugar (the default which comes with the kit).


If anyone has anymore suggestions please let us know either here or through the IBCC Facebook page.


I’ll leave you with a photograph of the model shortly before I realised I had to take one of the wings off again.

20170819_223133

Part 19 – The Shape of things to Come

Apologies to all for missing the date for the Build diary by not one, but two weeks.  Amazingly all of the delays were due to the first step which will be covered in this entry.  To try and make up lost time, this build diary and the next diary will both cover twice as much work as usual.

Last time we covered the mounting of the first two engines, the creation of the second rudder, elevator and vertical stabiliser and the rehanging of the door.

Pic 18-26

For this diary we will cover our plans for the actual display of the model, the cutting of fuselage panels, the creation of the second inboard and outboard flaps, the second aileron, and the mounting of the last two engines.

During the two week hiatus in Build diary entries the archive team got together and discussed what would happen to the model once it has been finished.

Whilst we do not yet have anywhere to actually display the model, it was decided that a diorama of the aircraft being repaired on a dispersal would allow us to display the model to its best advantage, whilst providing a reason to make portions of the interior visible through removed panels (if anyone reading this has any of their own ideas that they think might be better please comment and we’ll definitely consider them).

We haven’t yet reached a decision on which aircraft this model will be displayed as, if anyone has any ideas or preferences, please let us know in the comments (photo documentation would be a bonus).

Part of the result of this decision was the realisation that the door in the tail of the model would need to be open and the ladder in place to allow the crew to board, so they were both removed from their places in the tail section of the model and the door was rehung in an open position.

The first piece of work to actually move this model towards completion was cutting around 140 aluminium panels out of metal sheets.  Of these 72 are for the bomb-bay doors alone(!).

Pic 19-01

This was achieved by securing a sheet of templates to the top of the aluminium sheet.

Pic 19-02

And then using a sharp knife to first cut out the template,

Pic 19-03

And then the panel, this was achieved by repeated scoring the metal with the knife (sometimes more than a dozen times for a single cut) until the sheet had been cut through.

Pic 19-04

This whole task involving five sheets of metal took almost two weeks to complete by itself and consumed nine knife blades.  These pictures are of the cut out panels (minus the bomb-bay doors) laid out as the will be in the finished model.

Pic 19-05

Pic 19-06

These were then all put aside until they will actually be used.

Pic 19-07

With that done it was time to move on to the parts for the model itself.

Pic 19-08

As ever, with these diaries, the first thing to be done was to cut out the parts for any structural components, in this case an aileron and inboard flap.

Pic 19-09

Which were then assembled.

Pic 19-10

Before stringers were added (also seen here is the outboard flap to replace the one I built backwards last time.

Pic 19-11

These parts were then sanded down and put aside until they could be finished.

Next came the task of marking out the rivet marks across all of the panels for this diary, using the frame as a guide.

Pic 19-12

Pic 19-13

With that done, we moved on to assembling the engine mounts (this picture is from the last build diary as I forgot to take a picture at this stage).

Pic 18-02

With this done the next task was to paint all of the pieces.

Pic 19-14

Having done that, the flaps could be installed in the trailing edge sections.

Pic 19-15

Pic 19-16

Pic 19-26

Pic 19-27

The smaller parts for the cockpit could be put together.

Pic 19-17

And the Pilot’s chair could be finished off by adding the side and foot plates, legs and seat control.

Pic 19-18

Pic 19-19

Pic 19-20

It was also at this stage that the four document holders were glued into the cockpit, next to the pilot’s position.

Pic 19-21

Followed by the flight engineer’s seat and the chairs for the Wireless operator and navigator.

Pic 19-22

Pic 19-23

Next, two control rods were glued into both the aft bomb-bay section and the cockpit section of the fuselage.

Pic 19-24

Pic 19-25

Before we finally moved on to adding the panels to the wings and ailerons.

Pic 19-28

Pic 19-29

Pic 19-30

Once they had been built the ailerons then had panel lines scribed into their surface with a sharp knife (unlike the rest of the wing the ailerons were often fabric covered).

Pic 19-34

And the last panels to be attached were the two sides of the cockpit.

Pic 19-31

Pic 19-32

Then we moved on to adding the wiring harnesses to the inboard engine mounts.

Pic 19-35

Before mounting them on the wing main-spar section of fuselage (at this stage we also glued the two inboard fuel tanks into their bays).

Pic 19-36

And finally mounted the two engines onto the frames.

Pic 19-37

Then we finished off the framework for the second outboard engine nacelle.

Pic 19-38

The final stage of construction for this build diary involved taking these parts.

Pic 19-33

Which were used to bridge the gap between the tail section and the mid upper gun section of the aft fuselage, whilst also filling in the area near the tail wheel.

Pic 19-39

A red wire was also run from the horizontal stabiliser’s spar forwards, and was run as far forward as the rear spar of the wing.

With the two aft-most sections joined it was possible to add the other three main sections of the fuselage, joining them together so that the stringers lined up.

Pic 19-40

And finally adding the two inboard trailing edge sections to finish off the main structure.

Pic 19-41

Leading to it being possible to stand the model on its own three legs at long last.

Pic 19-42

Bringing us to this diaries’ conclusion.

Pic 19-43

Pic 19-44

Pic 19-45

Next week we will be starting to fill in the bomb-aimer’s position, adding more details to the wings, cladding more of the fuselage and attaching the wings to the model.

Part 18 – Driving for the Finish

Two weeks ago we added a wing-tip to the new starboard wing of the model, added the skin to the leading edge of the other wing and added a door into the rear fuselage.

Pic 17-20

Over the last two weeks we’ve been working on two of the engine mounts, the tail wheel, the fourth engine, and the second vertical stabiliser, rudder and elevator.

As always here are all of the parts for the diary’s work laid out together.

Pic 18-01

The first task that was attacked was the assembly of the major parts of the two outboard engine mounts and their nacelles.

Pic 18-02

These were then set aside until they could be painted.

Next the tailwheel and the two outboard engine oil tanks were assembled (I hadn’t noticed at this point that the hubs of the tail wheel should be black).

Pic 18-03

Following the smaller parts, the emphasis moved on to the larger assemblies.

Pic 18-04

First, removing the parts from their frets.

Pic 18-05

Before assembling them into their various structures.

Pic 18-06

And adding the stringers and sanding them into shape, it was at this point that I noticed that the outboard trailing edge flap had been built the wrong way around.  To date the replacement parts have not arrived, hopefully they will by next week.

Next, I rivet marked the “skin” of the elevator.

Pic 18-07

Before removing a section of the frame of the tail section to allow the tail wheel to be installed.  At the same time I returned to the door which was installed last week and modified the position of the latch-hold and the shape of the surrounding door-frame to allow the door to open.  Unfortunately the shape of the hinges seem to prevent the door from opening smoothly.

Pic 18-08

At this stage it was possible to paint everything in green and black (with a little silver).

Pic 18-09

Before beginning the final assembly by installing the tail wheel.

Pic 18-10

Followed by assembling engine four.

Pic 18-11

With these two assemblies complete, our attention turned to the engine mounts, first drilling holes into the bulkheads, and into the skin of the underside of the port wing.

Pic 18-12

Then, the electrical boards were added to the two bulkheads, along with the frame for the engine nacelle.

Pic 18-14

Pic 18-15

Before priming and painting the area within and around the nacelle.

Pic 18-16

Pic 18-17

And adding the oil tank and the last bits of the nacelle framework.

Pic 18-25

The rear end of the nacelle done, we next added the beginning of a wiring harness to the engine mounts.

Pic 18-23

Before attaching them to the bulkhead, and installing the engines.

Pic 18-24

With the big jobs done, we finished off by adding the arched piece to the head of the cockpit, and two frame formers to the mid-upper turret mount.

Pic 18-13

Attached the only outboard flap to the relevant wing (the missing skin panel behind the flap was replaced after installation).

Pic 18-19

Pic 18-20

The skin and some small details were added to the elevator.

Pic 18-22

More skin was added to the wing main-spar section.

Pic 18-21

And a small, silver cable was added to the interior of the starboard vertical stabiliser.

Pic 18-18

Bringing us to the conclusion of this build diary.

Pic 18-26

Pic 18-27

Pic 18-28

Next week we will be adding the other two engine mounts to the wing main spar, adding many of the remaining cockpit instruments and adding the remaining skin panels to the two wings.